
I recently bought a unbranded WiFi Dual CT Clamp Meter from Aliexpress.
I need it to replace a Tomzn DIN Power Meter (from Aliexpress too) for two reasons: safety and completeness. This meter is not invasive, it doesn’t interfeere with electrical system.
These are all cheap chinese board so better not trust them too much.
The DIN Power Meter uses a shunt resistor to measure current but it cannot distinguish the power “direction”. I’m not able to know if my plug & play solar panel is producing enough power and current is flowing into electric network.
I received in cheap brown box with some label on it: PJ1203A is the model number and it’s Tuya based.
Well, i don’t particularly like Tuya but i already know there are many options to avoid it.
The last chance is to replace the board with a ESP but.. let’s keep it for later.
First of all, let’s try it. I connect it to power, install first Clamp, connect it to WiFi and it works.
I immediately see some kind of chinglish words indicating consumed/produced power.
I’m excited but.. it was too easy.
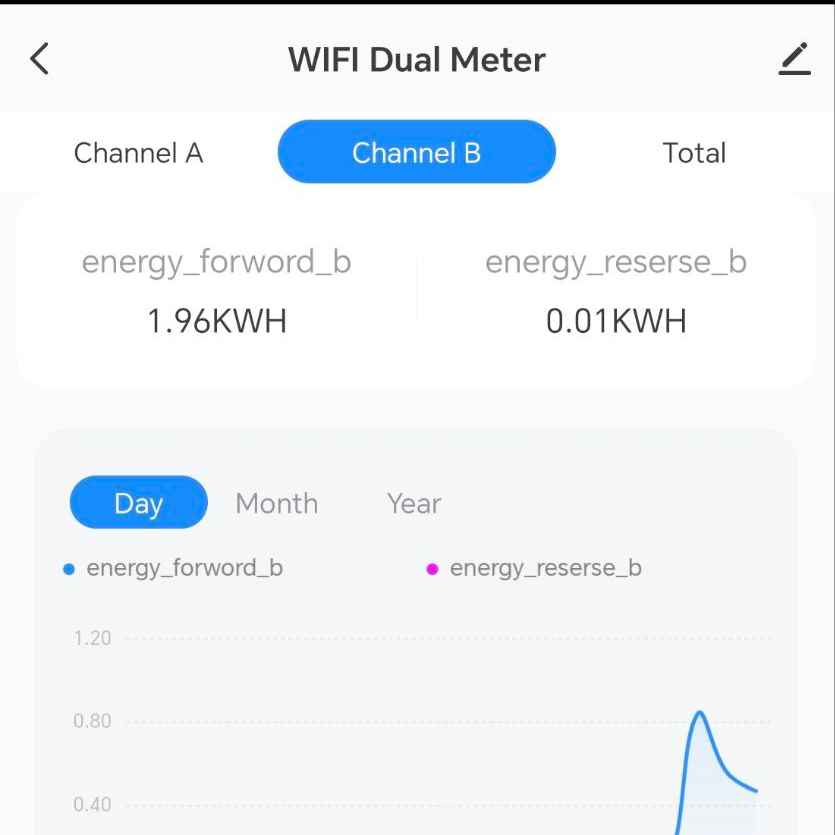
I configure HomeAssistant using LocalTuya to see all the data and i find the first big issue.
There is no entity indicating current “direction” and the Power value never goes below 0, it’s always a positive number even if power is going towards electrical supplier.
This means this product is unuseful for me since i need precise data.
I can’t continue working with Tuya so.. let’s open it.
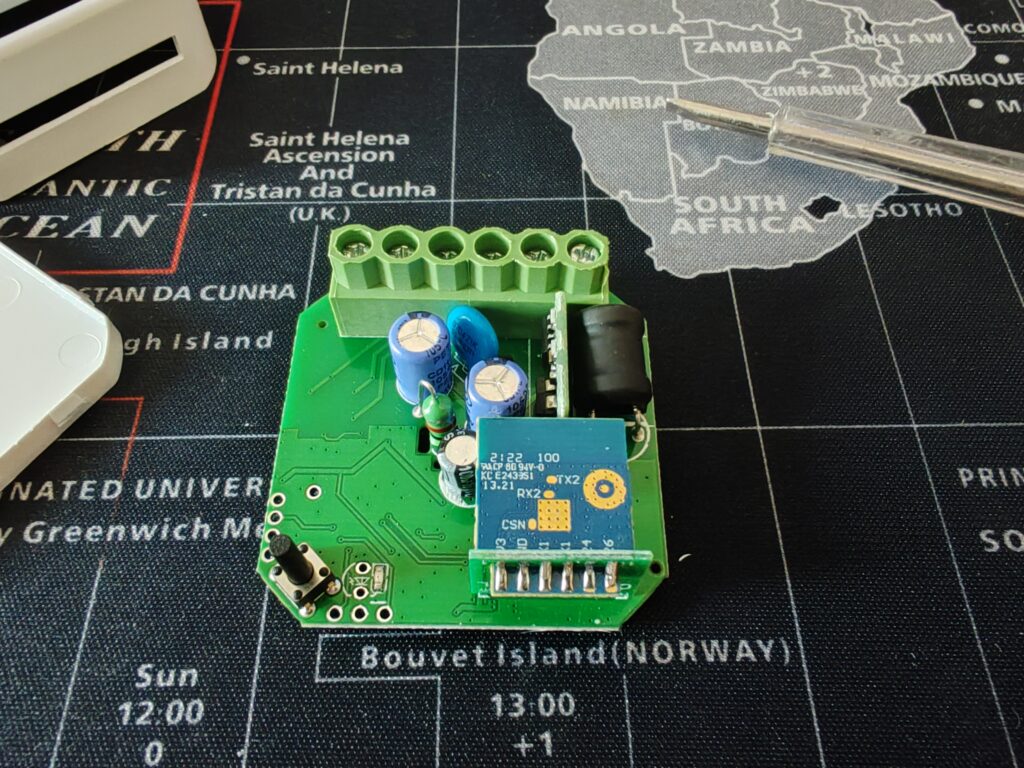
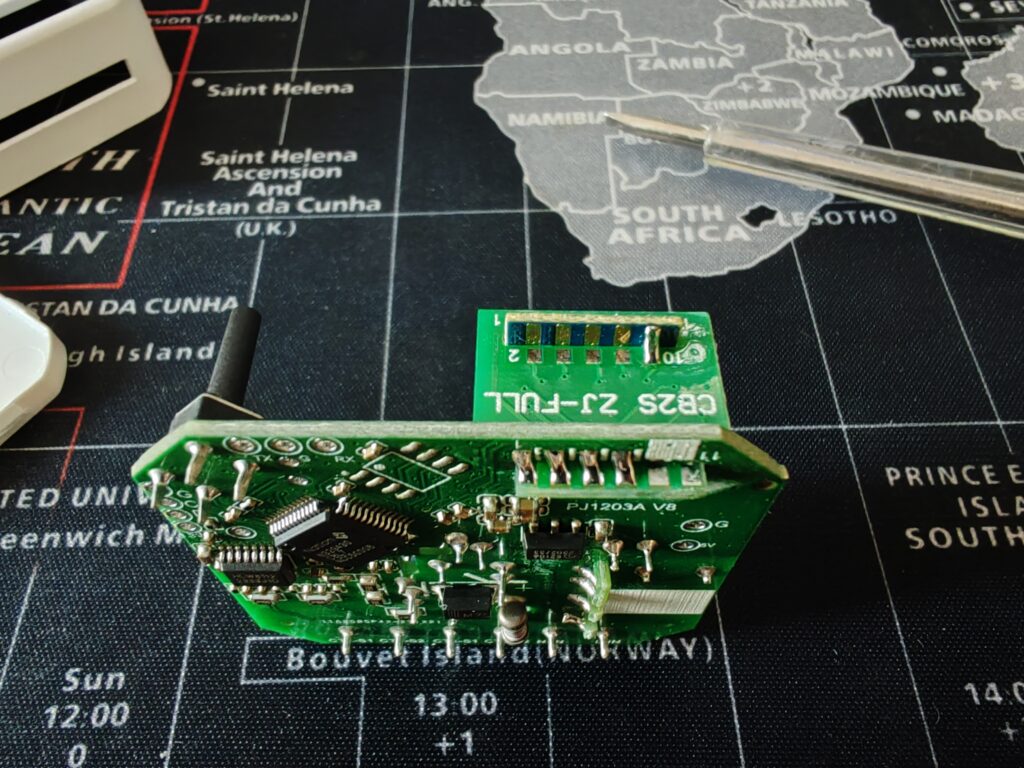
There’s an MCU underneath the board and a very common esp-like board.
It’s a CB2S and it’s not an ESP. In fact it’s a BK7231N based board. It’s very common today to see this kind of boards since they should be cheaper than ESP.
I start by desoldering the board from the “extender board”, wire up my USB UART adapter to VCC (3.3v), GND, TX1 and RX1.
Open LTChipTool (which is a software made specifically for this board) and dump the firmware. This procedure is quite easy, you just need to connect for a bit the CEN pin on the board to Ground. ( Do not keep it connected, just keep it grounded for 1-2 seconds ).
Reading starts and after a minute or so i have the firmware backup in my hand.
LTChipTool has now a great feature which analyzes firmware dump and tries to extract configuration from the chip and Tuya Servers. It even generate a yaml configuration file for ESP Home with all sensors, inputs, switches, led and much more!
This worked great on this particular device since all the data is produced from a different chip and it just send data using TuyaMCU protocol to the BK7231N board. This means ESP Home just need to know which data is what and that’s it.
I’m not sure it could be as precise for different implementations which required some calculations.
Before wasting too much time i flash a basic ESP Home firmware. Since this is the first time i flash ESP Home on a non-ESP device, i want to try and also send an OTA update to make sure everything works as expected.
I generate a ESP Home item in HomeAssistant, set my board type and download a .uf2 file (from many options available) to be able to flash it with LTChipTool.
Flashing procedure is the same as reading: ground CEN for some time and it flashes the chip.
After flash i reboot it, wait some time and i see it on the network!
It works so let’s complete the ESP Home yaml with data generated from LTChipTool.
I clean it up, fix some bad translations, change some names and i send the OTA update.
Solder the board back up, closed the case and connect it back to power.
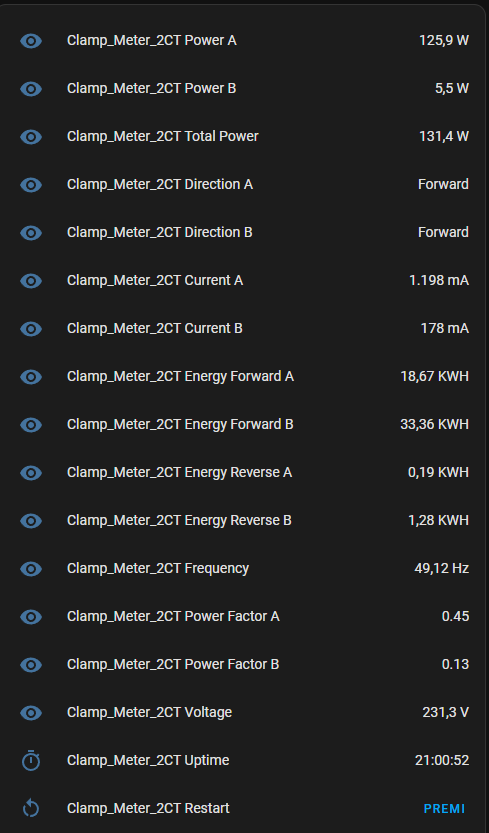
It works! Now i’m able to get all the data using a reliable ESP Home firmware, avoid a cloud connection which introduces trust and speed issues, and in case my internet connection goes down i can still get data from it.
At the end of this article you’ll find my YAML configuration for the board.
Considerations
It’s surprisingly easy to convert a Tuya device to ESP Home. LTChipTool does pretty much all the job.
That means you can easily convert also Smart Plugs, Smart light bulbs and everything else Tuya based.
YAML
esphome:
  name: clamp-meter-2ct
  friendly_name: Clamp_Meter_2CT

bk72xx:
  board: generic-bk7231n-qfn32-tuya

# Enable logging
logger:

# Enable Home Assistant API
api:
  encryption:
    key: "======================================================"

ota:
  - platform: esphome
    password: "============================================================="

wifi:
  ssid: !secret wifi_ssid
  password: !secret wifi_password

  # Enable fallback hotspot (captive portal) in case wifi connection fails
  ap:
    ssid: "Clamp-Meter-2Ct Fallback Hotspot"
    password: "=================================================="

captive_portal:

web_server:

mdns:

button:
  - platform: restart
    name: Restart

debug:
  update_interval: 3s

text_sensor:
  - platform: debug
    reset_reason:
      name: Reset Reason
  - platform: libretiny
    version:
      name: LibreTiny Version
  - platform: template
    id: tuya_direction_a
    name: Direction A
    filters:
      - map:
          - 0 -> Forward
          - 1 -> Reverse
  - platform: template
    id: tuya_direction_b
    name: Direction B
    filters:
      - map:
          - 0 -> Forward
          - 1 -> Reverse

sensor:
  - platform: uptime
    name: Uptime
  - platform: tuya
    sensor_datapoint: 101
    name: Power A
    unit_of_measurement: W
    accuracy_decimals: 1
    filters:
      - multiply: 0.1
  - platform: tuya
    sensor_datapoint: 105
    name: Power B
    unit_of_measurement: W
    accuracy_decimals: 1
    filters:
      - multiply: 0.1
  - platform: tuya
    sensor_datapoint: 106
    name: Energy Forward A
    unit_of_measurement: KWH
    accuracy_decimals: 2
    filters:
      - multiply: 0.01
  - platform: tuya
    sensor_datapoint: 107
    name: Energy Reverse A
    unit_of_measurement: KWH
    accuracy_decimals: 2
    filters:
      - multiply: 0.01
  - platform: tuya
    sensor_datapoint: 108
    name: Energy Forward B
    unit_of_measurement: KWH
    accuracy_decimals: 2
    filters:
      - multiply: 0.01
  - platform: tuya
    sensor_datapoint: 109
    name: Energy Reverse B
    unit_of_measurement: KWH
    accuracy_decimals: 2
    filters:
      - multiply: 0.01
  - platform: tuya
    sensor_datapoint: 110
    name: Power Factor A
    accuracy_decimals: 2
    filters:
      - multiply: 0.01
  - platform: tuya
    sensor_datapoint: 111
    name: Frequency
    unit_of_measurement: Hz
    accuracy_decimals: 2
    filters:
      - multiply: 0.01
  - platform: tuya
    sensor_datapoint: 112
    name: Voltage
    unit_of_measurement: V
    accuracy_decimals: 1
    filters:
      - multiply: 0.1
  - platform: tuya
    sensor_datapoint: 113
    name: Current A
    unit_of_measurement: mA
  - platform: tuya
    sensor_datapoint: 114
    name: Current B
    unit_of_measurement: mA
  - platform: tuya
    sensor_datapoint: 115
    name: Total Power
    unit_of_measurement: W
    accuracy_decimals: 1
    filters:
      - multiply: 0.1
  - platform: tuya
    sensor_datapoint: 121
    name: Power Factor B
    accuracy_decimals: 2
    filters:
      - multiply: 0.01

uart:
  rx_pin: RX1
  tx_pin: TX1
  baud_rate: 9600

tuya:
  # DPIDs processed from schema model: ebtly8
  on_datapoint_update:
    - sensor_datapoint: 102
      datapoint_type: enum
      then:
        - text_sensor.template.publish:
            id: tuya_direction_a
            state: !lambda "return std::to_string(x);"
    - sensor_datapoint: 104
      datapoint_type: enum
      then:
        - text_sensor.template.publish:
            id: tuya_direction_b
            state: !lambda "return std::to_string(x);"

number:
  - platform: tuya
    number_datapoint: 1
    name: Forward Energy Total
    unit_of_measurement: KWH
    min_value: 0
    max_value: 99999999
    step: 1
  - platform: tuya
    number_datapoint: 2
    name: Reverse Energy Total
    unit_of_measurement: KWH
    min_value: 0
    max_value: 99999999
    step: 1
  - platform: tuya
    number_datapoint: 116
    name: Voltage Coef
    min_value: 800
    max_value: 1200
    step: 1
  - platform: tuya
    number_datapoint: 117
    name: Current A Calibration
    min_value: 800
    max_value: 1200
    step: 1
  - platform: tuya
    number_datapoint: 118
    name: Power A Calibration
    min_value: 800
    max_value: 1200
    step: 1
  - platform: tuya
    number_datapoint: 119
    name: Energy A Calibration Fwd
    min_value: 800
    max_value: 1200
    step: 1
  - platform: tuya
    number_datapoint: 122
    name: Frequency Calibration
    min_value: 800
    max_value: 1200
    step: 1
  - platform: tuya
    number_datapoint: 123
    name: Current B Calibration
    min_value: 800
    max_value: 1200
    step: 1
  - platform: tuya
    number_datapoint: 124
    name: Power B Calibration
    min_value: 800
    max_value: 1200
    step: 1
  - platform: tuya
    number_datapoint: 125
    name: Energy B Calibration Fwd
    min_value: 800
    max_value: 1200
    step: 1
  - platform: tuya
    number_datapoint: 127
    name: Energy A Calibration Rev
    min_value: 800
    max_value: 1200
    step: 1
  - platform: tuya
    number_datapoint: 128
    name: Energy B Calibration Rev
    min_value: 800
    max_value: 1200
    step: 1
  - platform: tuya
    number_datapoint: 129
    name: Report Rate Control
    unit_of_measurement: s
    min_value: 3
    max_value: 60
    step: 1

binary_sensor:
  - platform: tuya
    sensor_datapoint: 103
    name: Tbd
Lascia un commento